Start Co-Authoring Excel Workbooks in 6 Easy Steps
(Note: The Co-Authoring Excel feature is only available in Excel 365, Excel for the web, and Mobile versions. )
If you are wondering how to collaborate with your team using Excel, you have come to the right place. In this guide, I’ll teach you how to easily use the Excel co-authoring feature in five simple steps. With the help of this guide, sharing your Excel spreadsheets will no longer be a nightmare.
Let us get started.
You’ll learn:
How Co-Authoring Excel Sheets Work?
Excel co-authoring, allows you to collaborate in real-time, with multiple users while working on a workbook/spreadsheet. I am sure that most of us are familiar with this concept from using Google Sheets/ Google Docs. This feature helps eliminate unnecessary confusion and improves productivity in one go.
But, unlike Google Sheets, Excel co-authoring is available only for Excel 365 and its online versions. In the next section, I’ll give you step-by-step instructions to make Excel co-authoring a success.
Related:
4 Best Methods to Lock Cells in Excel
How to Add a Watermark in Excel? 2 Easy Methods
How to Make Excel Track Changes in a Workbook? 4 Easy Tips
How to Use Co-Authoring in Excel?
Co-Authoring Excel sheets is pretty straightforward. You can start collaborating in Excel by following these simple steps:
Step 1: Click on the Share Option
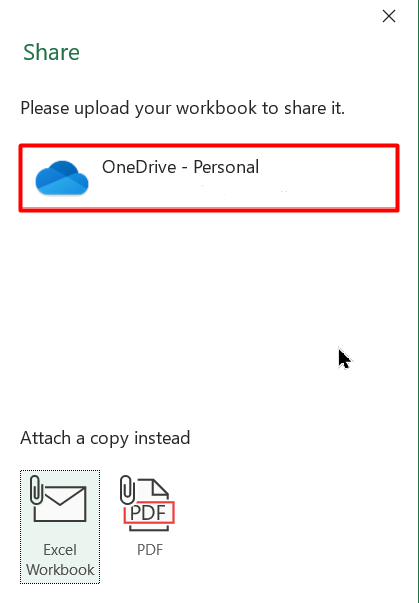
First of all, you need to share the Excel sheet to collaborate with your team. You can find the Share option in the top right corner of the worksheet.


(Note: If your workbook is saved locally, Excel will prompt you to save a copy in OneDrive. Please allow it. )

Step 2: Invite Your Team
Clicking on it will take you to the sharing window. Here, you can invite collaborators directly using their emails or names. Just type the recipient’s e-mail and press Enter. You can add as many collaborators as you want.
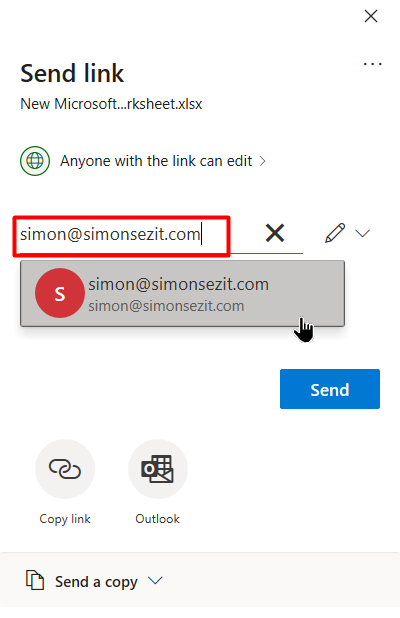

Please note that Excel may automatically suggest names or emails from your contacts, history or organizations.
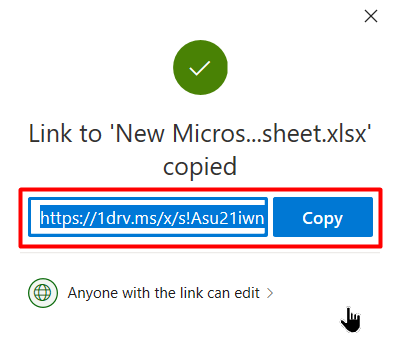
If you don’t wish to share the workbook through email, you can send a shareable link instead. Get this link by clicking the ‘Copy Link’ option right below the email bar.


Copy the unique link and message it to your teammates.

Also Read:
How to Protect Cells in Excel Workbooks —5 Easy Ways
How to Indent in Excel? 3 Easy Methods
How to Add Subscript in Excel? (6 Best Methods)
Step 3: Allow Edit Access
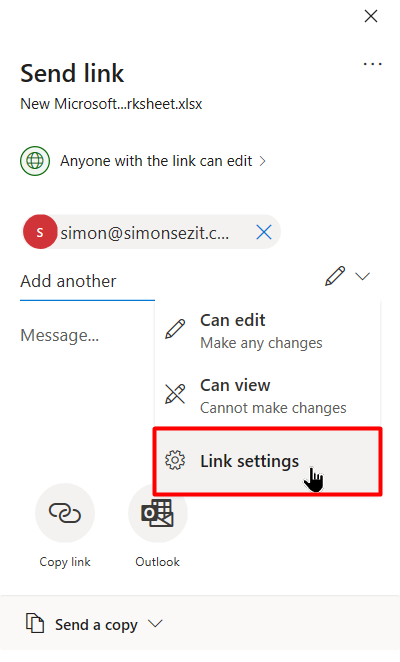
You can modify the collaborators’ access level by clicking on the Edit option (pen-shaped icon) right next to the email bar. Set it to ‘Can Edit’ to allow co-authoring in Excel.


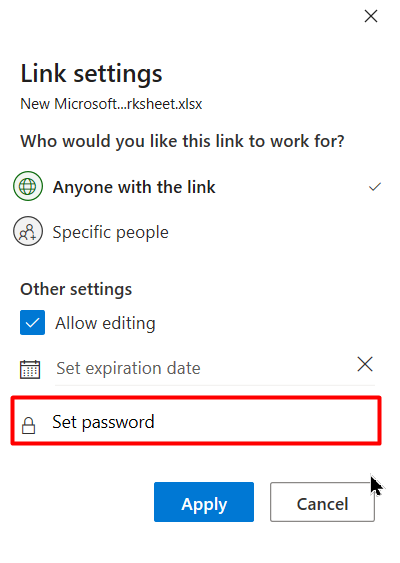
Right below, inside Link Settings, you can set a password and expiration date for people who access it using the shareable link.


Step 4: Collaborate on the Go
When your team members accept the invite and open the workbook, they can start editing right away along with you. You can see their names or their initials on the top-right corner of the worksheet if they are actively using the workbook.


Moreover, in a shared workbook, you can see what other people are currently working on. Their current cell position will be highlighted with a unique color.
Step 5: Use Comments
Comments are crucial if you want to successfully collaborate in Excel. This feature allows you to communicate inside the workbook and resolve issues as soon as possible.
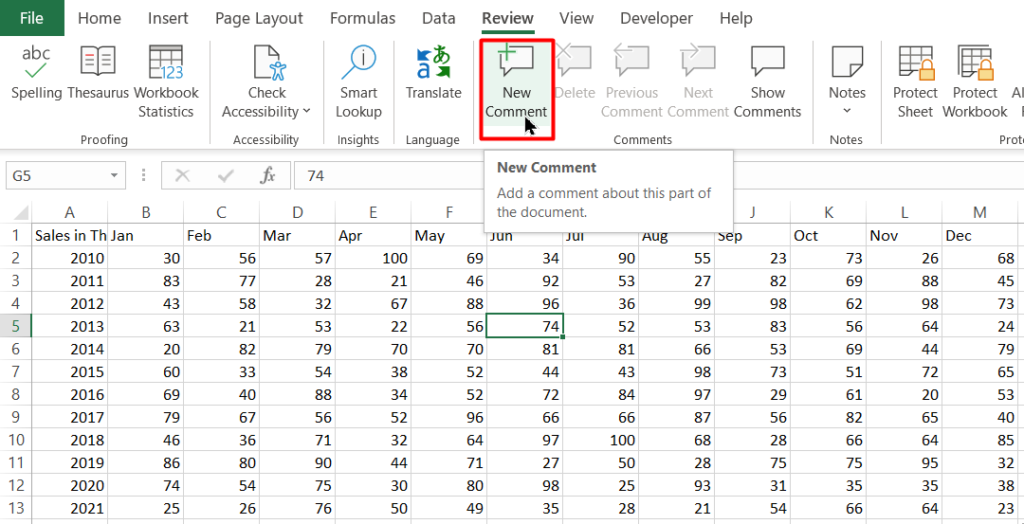
To insert a comment select the relevant cell and click on the New Comment button in the Review tab.

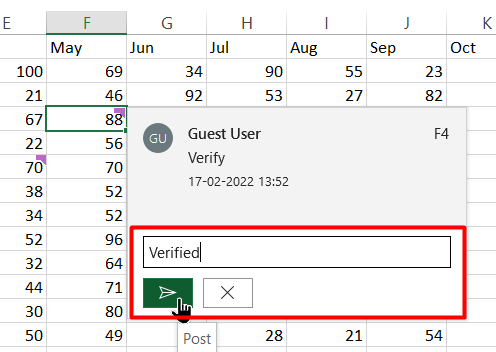
Then, type your comment in the Comment Box and click on the Arrow button to post it.


Repeat the process if you want to add more comments. You will see that all your commented cells will be highlighted with a small coloured marker.


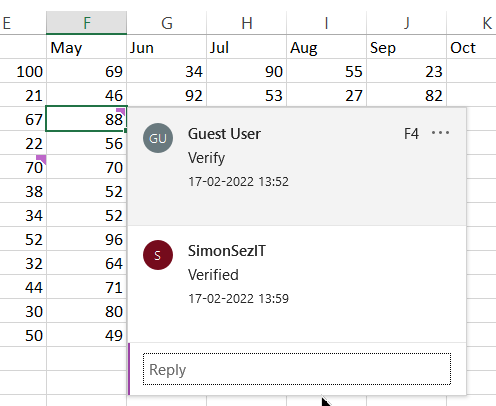
Now, other users can see the comment and reply back. Please remember to add the “@” symbol before a user’s name to direct a comment at that specific user. This will notify them and help you keep track of the comment threads.

A thread will be created if you make a comment and others reply to the comment. Such threads can be either resolved or deleted.

To view all the comments at once, click on the Show Comments button in the Review tab. This will display all the comments including the cell reference where the comment was made. You can also click on the Comments icon in the top right corner of the Excel window to view them.


Step 6: Track Changes While Collaborating
To view the changes made by everyone, open the same worksheet in Excel web version and click on the Show Changes option in the Review tab.
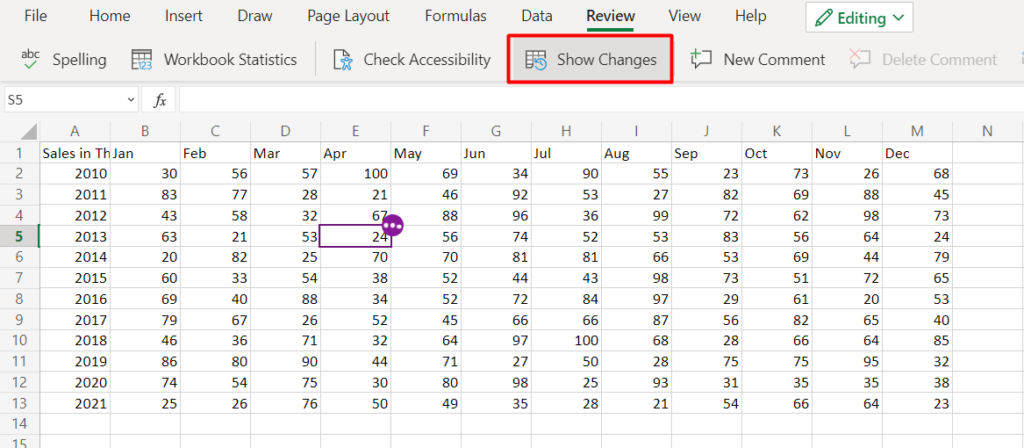

This will open a window listing the changes made by everyone on the shared worksheet.
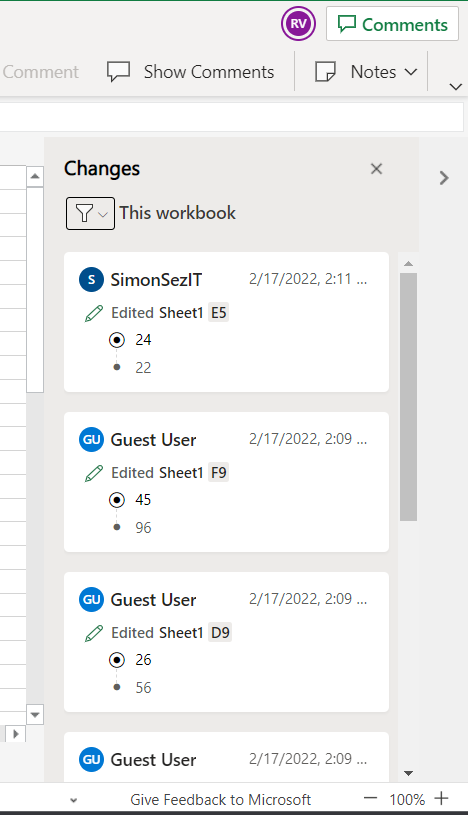

You can use the nearby filter option to select the changes made in specific cells/ ranges.
Suggested Reads:
How to Autofit Excel Cells? 3 Best Methods
How to Extract an Excel Substring? – 6 Best Methods
How to Shade Every Other Row in Excel? (5 Best Methods)
Closing Thoughts
In this short guide, we learned how to share, collaborate, and co-author an Excel worksheet. Before we wrap up, let me share a few tips to make Excel co-authoring a piece of cake.
First, make sure that you share the worksheet with a select few people, to begin with. It can become overwhelming and chaotic if there are too many collaborators. Also, be mindful of the comments you make and comment only when necessary.
We hope you found this article useful. Please let us know if you face any difficulties while collaborating in Excel. We are always happy to help.
Please visit our free resources section for more high-quality Excel guides.
Ready to dive deep into Excel? Simon Sez IT has been teaching Excel for over ten years. For a low, monthly fee you can get access to 100+ IT training courses. Click here for advanced Excel courses with in-depth training modules.

