How to Set Print Area in Excel? Step-by-Step Guide
(Note: This guide on how to set print area in Excel is suitable for all Excel versions including Office 365.)
In Excel, there are 1,048,576 rows and 16,384 columns in one sheet. But, when you hit the print command the entire sheet is printed by default. Obviously, we don’t need to print all of it on paper.
That’s why Excel allows you to specify which parts to print using the Print Area feature.
In this guide, I’ll show you how to set print area in Excel, the easy way.
You’ll learn:
- What is Print Area?
- How to Set Print Area in Excel?
- How to Set Multiple Print Area in Excel?
- How to Modify the Print Area in Excel?
- How to Ignore Print Area?
- How to Clear Print Area?
- Print Area FAQs
Related:
How to Delete a Pivot Table in Excel? 4 Best Methods
How to Indent in Excel? 3 Easy Methods
How to Use the Format Painter Excel Feature? — 3 Bonus Tips
What is Print Area?
Print area in Excel is nothing but a pre-selected area in a spreadsheet that you want to be printed on paper. It defines the parts or cell ranges for printing.
You can select multiple print areas in a worksheet. Each area will be printed on a separate page. When you save the workbook, the print area will also get saved. But you can clear it later if you don’t want to take a printout.
It’s always a good idea to define the print area before you take a printout. This is because, when you define a print area, you also get to see what the printed page looks like and can check if the rows and columns are not cut off while printing in the print preview.
How to Set Print Area in Excel?
Let’s see how to quickly set the print area to print a specific part of the worksheet.
- Select the cells that you want to print.


- Go to the Page Layout tab and click on Print Area -> Set Print Area.
When you hit the print command, only this print area will be printed on paper. It will be indicated by a light border.


Also Read:
How to Use Goal Seek in Excel? (3 Simple Examples)
How to Insert Multiple Rows in Excel? The 4 Best Methods
How to Autofit Excel Cells? 3 Best Methods
How to Set Multiple Print Area in Excel?
To set multiple print areas, all you have to do is just select multiple ranges by holding the Ctrl button, before clicking on the Set Print Area button.


That’s all! All your selected cell ranges will be marked inside the print area.
Now, each one of these separate print areas will be printed on a separate page when you hit the print command.


Before printing, you can format the settings by clicking on Page Layout -> Page Setup.
How to Modify the Print Area in Excel?
In case you want to modify the print area before heading for printing, you can use the Page Setup dialog box.
To open it, go to the Page Layout tab and click on the small arrow in the corner of the Page Setup section.
Alternatively, you can use the shortcut Alt+P+S+P.


In the Page Setup dialog box, go to the sheet tab and modify the values in the Print Area section.
You can add more range of cells using commas and delete ranges as you wish.


Once you are done with it, click on the Print button at the bottom of the dialog box to print the set Print Area on paper.
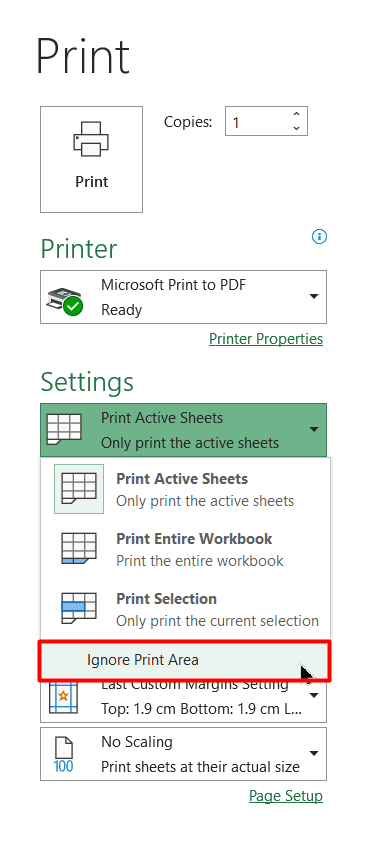
How to Ignore Print Area?
In case, at the time of printing you decide you want to ignore the print area, just click on the option Ignore Print Area.


How to Clear Print Area?
To clear the print area that you set, simply click on the Page Layout tab, Print Area, and then Clear Print Area.
Print Area – FAQs
Why do all the columns or rows in the print area are not getting printed?
Most probably, the number of columns and rows in your print area exceeds the size of the paper. You can fix this by using the “Fit all Columns in One Page” or the “Fit all Row in One Page” under Scaling Options of the Print menu
Why is the print area getting printed over multiple pages?
If you have selected more than one non-adjacent cell range, they will be printed on separate pages by default. But, if you have selected only one cell range, then most probably it exceeds the paper size. To fix this, try using the “Fit Sheet on One Page” option under Scaling Options of the Print menu
Suggested Reads:
How to Group Worksheets in Excel? (In 3 Simple Steps)
How to Shade Every Other Row in Excel? (5 Best Methods)
How to Use the Excel Fill Handle Easily? (Top 3 Uses with Examples)
Closing Thoughts
In this article, we saw how to set up the print area in Excel properly to avoid wasteful printing of unnecessary data. Use this method to save paper and print only what is necessary.
Please visit our free resources centre for more high-quality Excel guides.
Ready to take the next step and hone your skills in Excel?
Simon Sez IT has been teaching Excel for over ten years. For a low, monthly fee you can get access to 100+ IT training courses. Click here for advanced Excel courses with in-depth training modules.

