Manual Mail Merge Setup in Word 2010
Aside from using the Mail Merge Wizard, we can also use the Mail Merge facility in Word 2010 manually. As usual, we need to prepare the data for mail merge. The data can be prepared in a number of formats, but most database systems will produce data in .csv (Comma Separated Values) format. The example we have here is a .csv file containing the list of recipients and their addresses prepared in a Notepad.


If you are able to export data into a .csv file depending on the database system that you have, then you will be able to use mail merge in the way we are going to use it here.
To start Mail Merge, go to the Mailings tab of the Ribbon. Go to Select Recipients and click on Use Existing List. Look for and open the .csv file that we are going to use. To confirm if you have the correct recipients, click on the Edit Recipient List also on the Mailings tab, and there you can see the recipients.


Now we are going to create a set of labels for our letters. Still on the Mailings tab, go to Start Mail Merge and select Labels.


The Labels dialog appears and here you can specify the type of printer that you are using. Select whether you are using a Continuous-feed printer or a Page printer, and choose the label vendor and product number of your printer. Click on OK and Word draws empty labels on the screen.


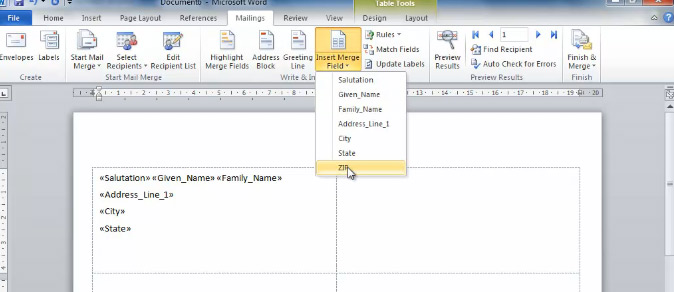
Now we can begin to insert the merge fields. Go to the Insert Merge Field button on the Mailings tab. Since Word has already looked at our .csv file, it knows the fields that we want to insert. We then select them by name in the order that we want. We can begin with salutation, followed by given and family names, then address line, so on and so forth.


Once we have inserted all the fields, click on Update Label on the Mailings tab. This fills the same pattern in on every label on the sheet.


Now that we have filled our labels with the right fields, we click on Preview Results button on the Mailings tab. This will replace the fields with the names and addresses of our recipients.


Having previewed the merge, we can now click on the Finish & Merge button to produce the labels. We are given three options; we can produce editable individual documents, print the labels directly to a printer, or send as email messages.


Let us take look at using recipient details from Outlook instead from data prepared in a .csv file or a spreadsheet. Go to Select Recipients on the Mailings tab, click on Select from Outlook Contacts. A dialog appears and we select a contact folder to import.


A Mail Merge Recipients dialog appears with a list of names from Outlook contacts. Take note that the headings of this list are from Outlook, so make sure that the details are listed under the correct heading. You may also include or exclude people from the merged email checking or un-checking the box. Click on OK.


Now click on Start Mail Merge on the Mailings tab, choose E-mail Messages, and begin typing your message.


To insert field, go to Insert Merge Field and we will be presented with a list of Outlook merge fields. Select the appropriate field.


Once done, we Preview Results and then click on the wedge arrows to step through them.


