Working with the QuickBooks Pro 2013 Chart of Accounts
There is only one reason why you keep your books in QuickBooks and that’s to keep your records up-to-date and to prepare year-end financial reports. But all of this would never be possible without the most important part of QuickBooks—the Chart of Accounts. This has to be set-up correctly so that when you run reports, the numbers will be accurate. Your Chart of Accounts is a list of all the accounts you use to track money in your business.
TIP: QuickBooks offers a ready-made Chart of Accounts specific to your industry, so if you don’t want to get into the hassle of creating your Chart of Accounts from scratch, you’ll be relieved to know this.
There are 3 ways to create your Chart of Accounts:
1. Press Ctrl + A (which you can do from anywhere in the program).
2. At the top right of the Home page, in the Company panel, click Chart of Accounts.
3. In the menu bar, choose lists and then Chart of Accounts.
To begin, go to the Home Screen, and then click “Chart of Accounts” under the Company Group.


Or
Select the Company Menu > Chart of Accounts.
You will notice that the list is set-up by TYPE. If you have multiples of the same type, the Chart of Accounts is listed alphabetically. In the previous section, we talked about one of the preferences—the ability to turn-on the General Ledger numbers. If those are turned on, then the name list will be sorted by number instead of alphabetically.


Adding a New Account
In the list, you will notice that there are several account types that you have to set-up like bank accounts. You may set-up bank accounts separately such as an Operating Account or Payroll Account.
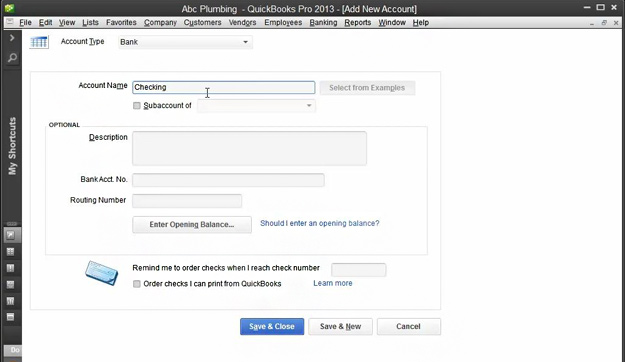
To add a bank account, click Account at the bottom left, then choose New.


Then select Bank. You will notice that (at the right side) there are preferences for each cash account. Click continue.


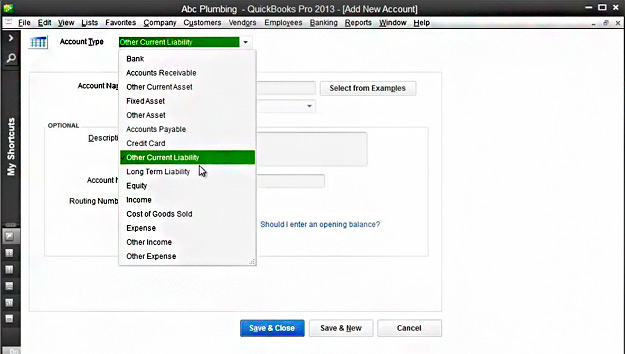
You can always modify the account type if you picked the wrong one in the previous window. Just scroll the arrow and choose the correct type at the top left side of the screen.


Then encode the account name (e.g. “Checking”).


A description is totally optional. You can add one if needed.
There is a place to put the Bank Account No. and the Routing Number. The program will use the information for online banking only that works directly with QuickBooks. It is suggested, therefore, to leave these tabs blank. Bank details should always be kept in strict confidence, which is one of your direct responsibilities.
Now, we need an opening balance. Click “Enter Opening Balance” and a window will open to put in the opening balance and statement date.


You will get the information in your bank statement. For example, the start date of your company is January 1. So the opening balance is the beginning number of your bank statement in January. Notice that the December 31 ending balance and the January 1 beginning balance are the same. This is the one you will use as the opening balance.
Let’s say we have $1,000.00. Input the amount without a dollar sign and without a comma. Otherwise it will create an error. Input the amount and a period, and the rest will fill in.
Now let’s put the Statement Ending Date—January 1, 2012. You can no longer enter transactions prior to this date.
Click OK. You should now see that you have one thousand dollars as of January 1, 2012.


At the bottom, there is a feature to remind you that when you reach a certain check number, it is time to order checks. If QuickBooks supplies your checks, just click the box “Order checks I can print from QuickBooks.” Hit “Learn More” for additional information.
You may opt to Save & Close to arrive at the screen just before the Chart of Accounts. Click Save & New, if you would like to be prompted to create another account.
When you hit Save & Close, a pop-up window will confirm that the transaction you have just encoded is more than 90 days old. If so, click “Yes”.
From time to time, QuickBooks will ask you if you would like to set-up online services. These will be covered in a separate module, so for now, click “No.”


Looking at your Chart of Accounts, you will notice that you now have a Checking account with a balance of $1,000.00, and a corresponding Operating Balance Equity of $1,000.00.
There are two types of asset accounts. These are Fixed Assets and Other Current Assets or Liquid Assets. Fixed Assets, for example, are things like vehicles, equipment, and land. Other Current Assets, for instance, are receivables, inventory, and prepaid expenses. There is a separate module discussion for other assets like Fixed Asset Management, Inventory Management, Aging of Receivables, etc.
Adding a Liability Account
A liability is something you owe like a loan. Each is classified as Short Term or Current Liability or Long Term Liability. Short Term loans are those you plan to pay within twelve months. Long Term Loans are those you plan to pay for more than twelve months.
Now, let’s set-up an account for Car Loans.
From the Chart, click Account>New.


Choose Loan, then Continue.
Notice that the default Account Type is Other Current Liability. If this needs to be a Long Term Liability, go ahead and change it.


Then encode “Car Loan” under the Account Name. You may enter a description and account number if needed.
Afterwards, enter the opening balance and the corresponding date.


Then hit Save & Close.
Key Things to Remember:
Here is some important know-how on the different types of accounts you might have to set-up…
• Bank Accounts – these are the accounts you hold at any financial institutions and are used by your business for checking, savings, money market, or petty cash funds.
• Accounts Receivable – this is where you put the money that your clients owe you for items such as unpaid invoices or goods purchased on credit.
• Other Current Asset – all other assets that are readily convertible to cash or used by the business within the normal operating cycle (which is normally 12 months).
• Fixed Asset – these are the assets that are usually depreciable (such as buildings, equipment, or furniture and fixtures) and non-depreciable (such as land).
• Other Current Asset – all other assets that do not fit with the above descriptions and are used in business beyond the normal operating cycle.
• Accounts Payable – these are just the accounts you ought to pay within the normal operating cycle (12 months).
• Credit Card – it is self explanatory, just a credit card account.
• Other Current Liability – money you owe over the next 12 months.
• Long Term Liability – money you have to pay beyond the 12 month operating cycle.
• Equity – is a residual account which represents an owner’s owneship in the business (called Retained Earnings for Cooperating and Owner’s / Partner’s Capital for Sole and Partnership business).
• Income – this is where you put the revenue that you earn from your main business transactions over the ordinary course of business.
• Cost of Goods Sold– this is typically an expense account but is more directly related to your revenue (it’s where you put all the expenses directly brought about by the production of goods or rendering of a service, which also goes by the term Cost of Sales).
• Expenses – all expenses related to the running of your business other than Cost of Sales.
Note: You can also set-up additional accounts when needed while you are already working with Quick Books.
Deleting an Account in a List
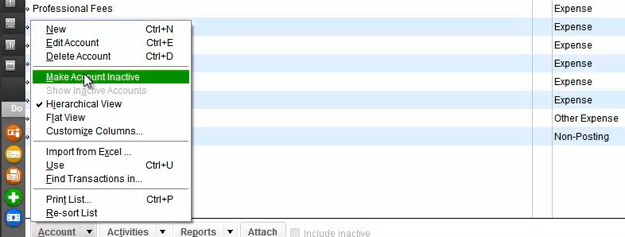
Items that you have used even one time cannot be deleted. An old bank account that you are not using anymore is an example. If you want to hide it in the list, just make the account inactive. The information will be included in the reports but not in your Chart of Accounts.


