Managing Users and Switching Accounts in Windows 8
The Administrator has complete control over the PC. If you are the Administrator for a Windows 8 computer, it is important that you understand how to set-up other users in a way that not only protects the PC from users accidentally wreaking havoc, but also in a way that enables them to work with the items they are allowed to access.
User Management
To manage users, go to Control panel > User accounts > Manage another account. Here you will see the accounts that exist on your PC.


You will notice that among the list of accounts there is a Guest account. A Guest account is a special type of limited user account that doesn’t require a password. This account is intended for users who are allowed to use the computer on a temporary basis. They can use software, play a game, or use the browser to access the internet, but they cannot install software or hardware, change the type of account, or protect created and saved files. The Administrator can turn the Guest account on or off.
Now, if you click on an existing Local user account while logged in as an Administrator, you can set-up Family Safety, change the account type from Standard to Administrator, or delete the account.


If you click on the Administrator account, you can change your account type and name, manage other accounts, or change the User Account Control settings. There’s also a link if you want to make changes to the Administrator account in your PC settings.


Switching to a Microsoft Account
To switch to a Microsoft account, you need to have a Microsoft account set-up as well as a live internet connection since Microsoft will need to check if the email you’ve entered is a valid on.
1. While logged-in to a local account or different account, go to PC Settings > Users. Under Your account, click on Switch to a Microsoft account.


2. You will be asked to confirm your current password. Click Next.
3. You will then be asked to enter your desired email address to be used to sign-in to your Microsoft account. Click Next.
4. Your account will be verified and once it’s been found, you will be asked to enter the password to that email address. Click Next.
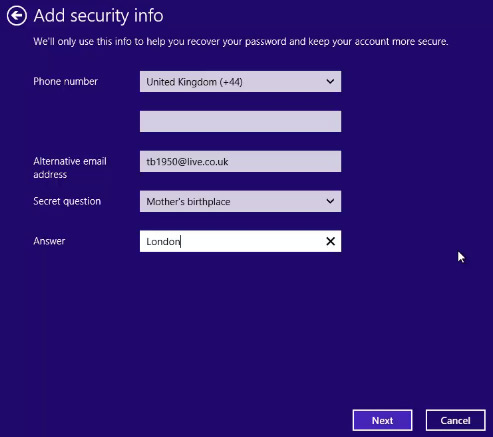
5. You will then be asked to add security information such as a phone number, alternative email address, and secret question and answer. Click Next.


6. Click on Finish. You can now use your Microsoft account the next time you sign-in to Windows.
Trust PC and Trusting Procedures
Note that your saved passwords for applications, websites, and networks won’t synchronize until you trust the PC. You will need to follow the Trust this PC link and go through a trusting procedure. Microsoft will use the existing security information to help ensure your identity. You will be sent an email message to confirm that the computer is a trusted PC. You need to follow the instructions in the email to confirm that it is a trusted device.


