Creating Basic Shapes in InDesign CS6
InDesign CS6 provides us with powerful drawing tools which allow users to create basic shapes and complex freeform drawings.
The shape tool is a very neat drawing tool that we can use to insert a new shape within the InDesign CS6 document. We can choose and insert three different shapes: rectangle, ellipse, or polygon. These shapes can be filled with color, remain empty, or hold graphics / text. The shape tool can do similar things as the frame tool. The only difference between the two tools is that that the frame tool will display a large X inside the shape, while the shape tool will not. The frame tool is best if you are creating a placeholder for a graphic or text.
To create a new shape:
1. Activate the Rectangle tool on the tool panel or by pressing the keyboard shortcut M.


2. On the InDesign document, left click, hold, and drag your mouse to draw the shape. As you draw the shape, the Smart Guides appear to help line up the borders of the shape with other objects and frames in the document.


3. Release the mouse button when finished.
4. You can resize the text frames by left clicking the sizing handle and dragging them up to the text.


A good tip to bear in mind is that when you are creating an ellipse or a rectangle, you also have the ability to create a circle or square as well. Don’t let the name of these shape tools trick you. You may also draw a perfect circle or square using the same shape tools. This applies to the polygon shape as well.
To create a circle or square using the ellipse or rectangle tools:
1. Select the Ellipse or Rectangle tool on the tool panel. You can use the keyboard shortcuts L for the Ellipse tool and M for the Rectangle tool.
2. Hold down the Shift key while you are drawing the shape on the document.
3. You will notice that as you are drawing the shape, it is restricted to a circle or square shape no matter which way you move your mouse. Once you let go of the Shift key, you can now change the shape of the circle or square or go back to drawing an ellipse or a rectangle.


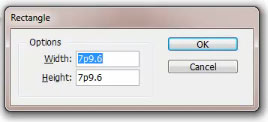
Aside from the click, hold, and drag method of creating shapes, you can also create them by specifying their width and height. This is a useful option when you are trying to achieve a precise size in which drawing it with your mouse can be difficult and frustrating.
To create shapes with specific sizes:
1. Select the Rectangle tool or press keyboard shortcut M.
2. Position the cursor where you would like to place one corner of the shape. You can also hold the Alt key to position the cursor where you want the center point of the shape to appear.
3. Left click with your mouse. You will be prompted with a dialog box for you to specify the width and height of your shape.


4. Once done, click OK. Now, the shape will be placed within the document.
Get our InDesign CS6 training tutorial course online with 9 hours of training videos.

