How to Create an Estimate in QuickBooks 2018
During this QuickBooks 2018 tutorial, we will demonstrate how to create an estimate.
Estimates – Part 1
An estimate is basically QuickBooks terminology for a quote. Construction is a great example because if someone needs their kitchen remodeled they are going to ask the company for an estimate or quote on how much the job will cost.
Some businesses don’t require estimates and that’s okay. If this is your case you can go straight to creating an invoice.
Getting Started
Once you are in the estimate window, you will notice a gray area on the right that gives you a summary of customer information. Once you pull in a customer this area will show you any transactions already created for that person. If you want to edit one of these or go to them you could.


Note: Remember to always select the customer’s job and not just the customer when starting an estimate.
If your customer needs an estimate for a job that hasn’t been created yet, you can easily set that up from this page. You can either select Add New from the dropdown menu, or select your client, leave the “;” after your customers name and type in the name of your new job.


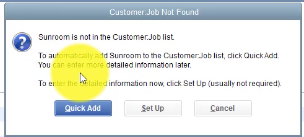
When you are finished hit the tab or enter key. A dialogue box will appear letting you know that your new Job name, in our case “Sunroom”, is not in the list. Select Quick Add to add this job and get started on your estimate. Now your new job will appear in the dropdown next to any previous jobs you have created.


In the top bar you will notice that there is a Class and Template dropdown with various options. If you are going to use the Class option it’s important that you use it on all of your estimates for consistency.
QuickBooks defaults to a Custom Template, but you also have a choice of various templates you can use for your customers. We will talk about customizing these and adding your own in a later module.
Other options you’ll want to specify are the Date of the Invoice, Invoice Number, and Address. When you are finished you can go ahead and click save.
Need to master QuickBooks? We offer 10 courses for QuickBooks. Click here to learn more.
Creating Your Estimate
Underneath item in the first line is where you will start listing out different items you’d like to include in your estimate. Here you will notice a list of items QuickBooks has in a practice exercise. We will be listing out our own items in a later module.


For now, we will choose one of the existing options. Based on the specifications already created the Description and cost are brought over. You can edit and change the Description based on your needs.
Here you can also specify the Quantify, Markup Amount, and Tax.


Estimates – Part 2
In the first part of this section we started creating an estimate. Let’s continue with the estimate we are creating.
Now that you have your items listed that you’d like to use in this estimate, let’s take a look at some of the options you have at the top of your estimate screen.
The first thing to notice is the main tab as the top of your screen and the ribbon below it with some options.


Find
The first option in the ribbon is the Find option. This is helpful if you are having trouble finding an estimate you have been working on. Use the left arrow to go to the previous estimate and the right arrow to go to the next estimate.
Keep in mind that everything in QuickBooks is ordered by date.
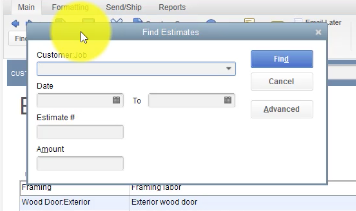
If you are still having trouble finding an estimate, click on the Find option and fill in some of the criteria to search for it.


New
The next option you will see is the New button. This is the same as the Save & New that you see at the bottom of your screen. This basically saves the estimate you are working on and opens a new blank estimate.
Save, Delete, and Create a Copy
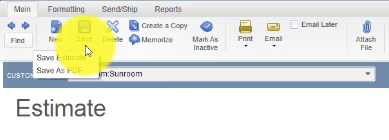
The next one over is Save. You can press this button to save your progress at any time during your estimate so you don’t lose your work. If you click the down area you also have the option to save your estimate as a PDF file.


The option next to save will allow you Delete your estimate and start over new. The Create a Copy option allows you to duplicate the work that your completed so far in a new estimate.
Memorize
The Memorize option is something we’re going to go over in a later module. As a quick overview this options is used if you have a repetitive transaction you don’t want to have to repeat manually every month and you’d rather QuickBooks do this for you.
Mark As Inactive
Mark as Inactive is helpful for a transaction you’ve put in and want QuickBooks to keep of record of it, but you don’t want to pull it into official reports. Simply mark the transaction as inactive until you are ready to make it active again.
Next we’ll take a look at the Print option. You’ll notice that the Preview is rather plain looking. Our example as it is doesn’t have a company logo or a telephone number. These are all things we’ll show you how to do when we get into customizing templates. You’ll also notice that you won’t see the markup column here. So if you want to markup a cost for a specific customer they are not going to see it.


Save and Close
The final options you have to customize your estimate are the Email, Attach a File, Formatting, Spellcheck, and Send/Ship option.
Once you Save & Close, follow along the Creating Invoices option to create an invoice on this estimate.
Get the complete online course for QuickBooks 2018. Click here to learn more. >>

