Linking Shapes and Diagrams in Visio 2010
In this article, we will discuss more about hyperlinks. Here, you will learn how to create links going to a specific shape within a Visio diagram, how to link two separate VSD files or diagrams, and how to create multiple links in one shape or textbox.
Getting the name of the shape
Before we can create a link to a specific shape, we first need to identify the name of the shape that we want. There are two approaches to this:
1. First option is to enable the Developer tab. To display the Developer tab on the Ribbon, go to Backstage view > Options > Customize Ribbon. Under Main Tabs, make sure that Developer is checked. Click OK.


Now that the Developer tab is switched on, select Shape Name found in the Shape Design group. This brings up the Shape Name dialog.


The name of the selected shape is found in the Name field. You also have the option to change the name of the shape if you like.


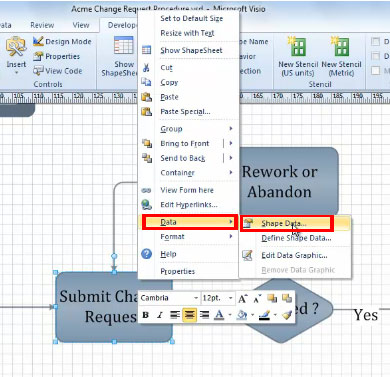
2. Second option is to right click on the shape or text box, select Data, and then Shape Name on the context menu. This brings up the Shape Data dialog.


You will find the name of the shape on the upper left hand corner following the words Shape Data. Unlike the in the first option, you can only view the name of the shape but cannot change it.


Linking to a specific shape
Now that we have the Shape Name, we can begin creating a link to a shape. To do this:
1. Right click on the shape or textbox, select Hyperlink.
2. For a link within a Visio diagram, leave the Address field blank on the Hyperlinks dialog and click on Browse along the Sub-address field. This brings up a smaller Hyperlink dialog.
3. Type the name of the shape or textbox in the Shape field. You also have an option to set the Zoom in percentage going to the linked shape. Hit the OK button once finished.


4. To activate the hyperlink, hold CTRL key and left click on the link. You will be taken to the particular shape name that was entered.
Linking separate diagrams or VSD files
1. Open the first diagram. Right click on the shape or textbox you would like to put the link, and then select Hyperlink.
2. On the Hyperlinks dialog, click Browse along the Address field and look for the other diagram or VSD file in your computer.
3. In the Sub-address field type in a particular Shape Name that you want from the other diagram. You may also enter or change the Description. Hit the OK button once done.
4. Now, follow the link by holding the CTRL key and left clicking, and the link will take you to the other diagram.
Creating multiple hyperlinks
1. On an existing link, right click and select Hyperlinks to open up the Hyperlinks dialog.
2. Click on the New button to create another link.
3. Following the same procedure in creating hyperlinks, complete the necessary fields in the Hyperlinks dialog. Click OK once finished.


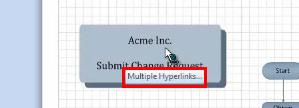
4. Now when you hover over the link, you will see a tip saying Multiple Hyperlinks.


5. Hold CTRL and left click on the link, you will be given three options: the name of the existing link, the name of the new link, and Edit Hyperlinks. Choose either of the links that you wish to open, or choose Edit Hyperlinks to make changes to the links.


Need Visio 2010 Training? Get 9 hours of Visio training by Simon Sez IT. Click here to try for free.

