More Tips with PowerPoint 2010 Shapes and Pictures
Shapes and pictures are essentially the main component of PowerPoint presentations along with text. Knowing how to manipulate them properly can only make you a more skilled PowerPoint user. Read on for selection of tips and tricks concerning shapes and pictures.
Shape effects
You can edit shapes to give your presentations a much sharper and more professional feel. The best possible way to learn is simply by experimenting with different combinations of shadow, glow, bevel and 3D rotation. All of these options can be found under the Shape effects menu when you have your shape highlighted.


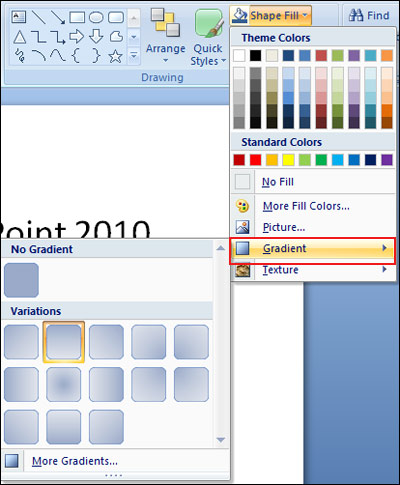
One method that’s definitely worth investigating is gradient shape fills. They can really bring depth to a slide and make shape far more interesting and engaging for the viewer. All gradient options can be found under the Shape fill – Gradient menu here:


Fill shapes with pictures
Filling shapes with pictures, when done well, can create a striking effect that will really bring your presentations to life. Simply navigate to the Shape fill menu shown above and select the Picture option. You can then Browse your hard drive to select your desired picture. Here’s a before and after example:


The format painter tool
PowerPoint 2010 presents you with numerous formatting options for shapes. Beyond the basics of line style and shape fills, the format painter is an excellent tool for repeating past formatting. Select the shape that has the formatting you want to copy. Highlight it and copy by using CTRL + C. Then highlight the shape on which you want to have the same formatting. Select Format painter from the Home tab and you’ll see your cursor change to a small paint brush. Click the highlighted shape with the paint brush cursor and you’ll see it now has the desired formatting.
Creating custom shapes
Occasionally you’ll find that PowerPoint 2010 doesn’t have the appropriate shape for your requirements. You can create your own freeform shapes by selecting the Freeform option from the Drawing menu on the Home tab.
Watch the file size and compress your pictures
Be careful of large files that will stop your presentation from being lean. The standard DPI rules don’t really apply here so just make sure your images are right for the video resolution of your machine. If your resolution is set to 1024 x 768 then your full-slide pictures should be 1024 x 768. Naturally for really important images, you might want to pump up the DPI a little bit to get a really crisp display. If you don’t know the video resolution for the laptop/PC your presentation is going to run on then just stick with 1024 x 768 – it is the most common resolution.
Be careful when you drag in pictures from other programs. When you copy and paste or drag a picture into PowerPoint from an external application, PowerPoint might create an embedded OLE object. An embedded OLE objects contains something called a WMF. This is a windows meta file which prevents PowerPoint from compressing the picture efficiently. Save the picture file in an external application like Photoshop first and then use the Picture insertion option from the Insert tab.
When you crop pictures, the discarded area still counts in a measure of the file size. Every time you compress an image that you’ve cropped, make sure you tick the ‘Delete cropped areas of pictures’ checkbox in the Options tab of the Compress menu.


You will need to play it a little bit by ear when it comes to pictures but just make sure the file sizes aren’t too large. Large file sizes will result in a large presentation file size and slower loading times for your images.


